Try Q-Chem in the Cloud Using AWS
How to run Q-Chem on Amazon EC2
Q-Chem provides a ready-to-deploy Amazon Machine Image (AMI) based on Amazon Linux 2 with the Q-Chem software already installed and configured to use the central licensing server maintained by us. There are no additional charges associated with using this AMI beyond what Amazon charges for the use of Amazon Web Services (AWS) resources. This is the recommended way for current Q-Chem customers to run Q-Chem on Amazon Elastic Compute Cloud (EC2) since it saves the time to install and configure Q-Chem on EC2.
Note on privacy: The Q-Chem AMI is set up to communicate with our central licensing facility by checking out a license each time a Q-Chem job is executed. While this allows us to identify each job execution for licensing purposes, no job-specific information is communicated.
Follow the steps below to get started with Q-Chem and IQmol on AWS. This guide covers three parts:
- Getting started with AWS and launching EC2 instances with Q-Chem. These instances are used as compute nodes for performing Q-Chem computations.
- Using IQmol to run Q-Chem calculations in the cloud.
- Accessing the instances directly via SSH to run Q-Chem from Linux terminal.
Launching Q-Chem instances from fully preconfigured images
-
Create and activate your AWS account
Create an AWS account if you do not have one. Follow the guide, How do I create and activate a new Amazon Web Services account? Usually, Amazon permits new users to use free tier nodes for one year making it possible to try AWS computing without being charged any usage fees.
Note: Amazon requires a credit card and a mobile phone number for account verification.
Note: Review Viewing Your Monthly Charges. -
Login to your AWS account
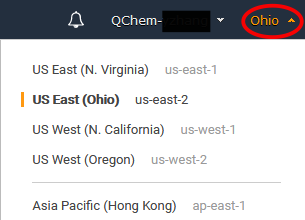
Sign into the Console at https://aws.amazon.com/ as root using your e-mail and password. The root user has full access to AWS resources, consult AWS Identity and Access Management (IAM) for guidelines on creating non-root users. Once you have logged in, in the right top corner of your screen next to your account name, you will find a drop-down menu to select the location your AWS machine. Follow the guide Regions, Availability Zones, and Local Zones to choose a region that suits you best.
-
Proceed to EC2 dashboard
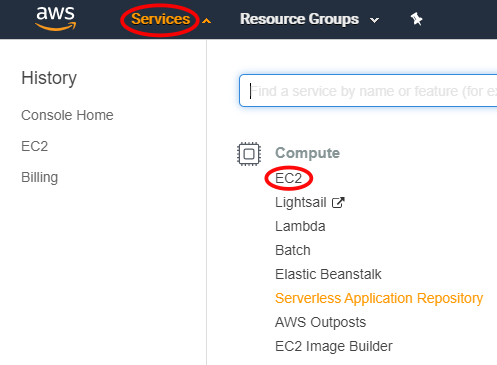
After signing into AWS Console, click on the Services tab at the top. In the drop-down, click EC2 under Compute.
-
Create your EC2 instance by loading the Q-Chem AMI
-
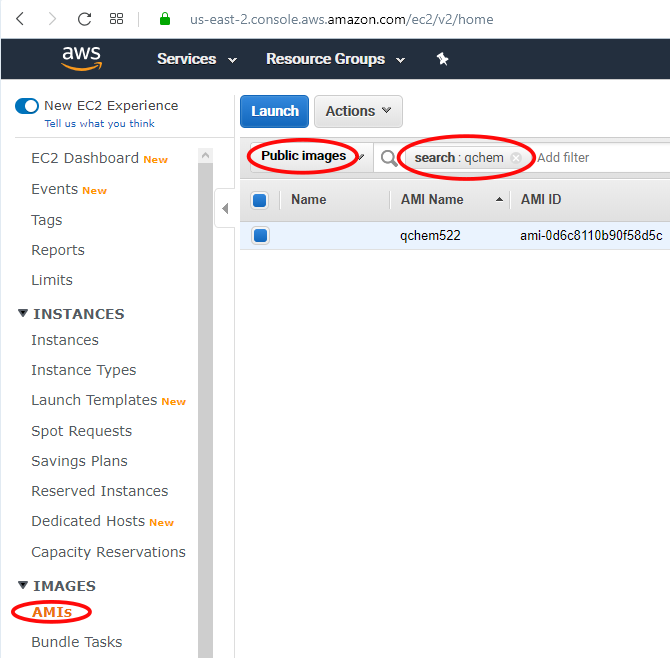
Locate the official Q-Chem AMI and begin to launch an EC2 instance. On the left panel of the EC2 dashboard, click "AMIs" under "IMAGES". In the drop-down menu beside the search box, choose "Public Images" and search for the AMI name "qchem". At this time Q-Chem has deployed this pre-configured AMI to the four AWS regions in the US (N. Virginia, Ohio, N. California, Oregon).
Note: If you select a non-US AWS region, you may not be able to find the AMI. In that case, please contact the Q-Chem support team at support@q-chem.com to let us know your region information. Once you find the Q-Chem AMI, select it in the list and from the drop-down menu "Actions", click "Launch".
Important! AMI ID varies depending on AWS region. Please verify the AMI Source to ensure you are loading the correct image: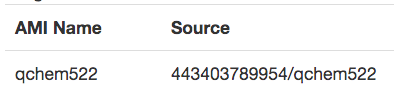
-
Choose an instance type. In the second step of instance launching you can choose an appropriate instance type for your computational job. In this example we use the free-tier t2.micro type. The t2.micro instance is well suited for testing and some educational uses, but its resources (1 virtual CPU and 1GB RAM) are insufficient for production level computations.
-
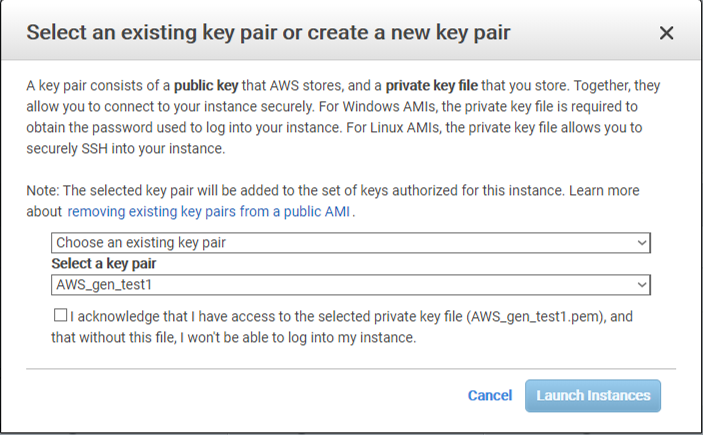
Click "Review and Launch". You will be asked to select or create a new key pair file for your instance. If this is your first time to launch an instance, you must create a new key pair. If you are launching multiple Q-Chem instances, using the same key for all such instances will make it easier to access them. If you are creating a new key pair, remember to save the key pair file! The keys are required for accessing the instance later.
-
Usually you do not need to modify other configuration parameters. Review them and finally launch the instance by clicking "Launch".
-
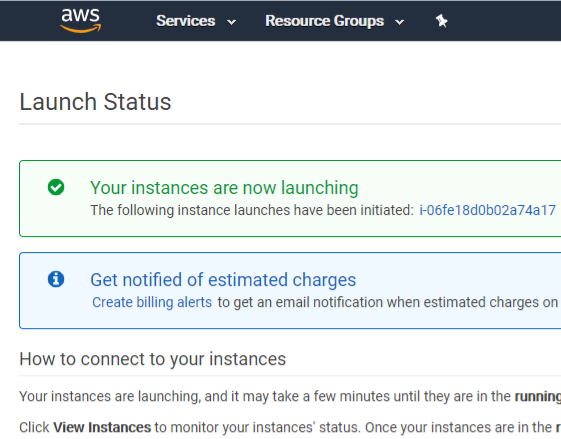
Once the instance has been launched, you can click the "View Instances" button to view the information of your instances.
-
-
Activate Q-Chem licenses for running on AWS
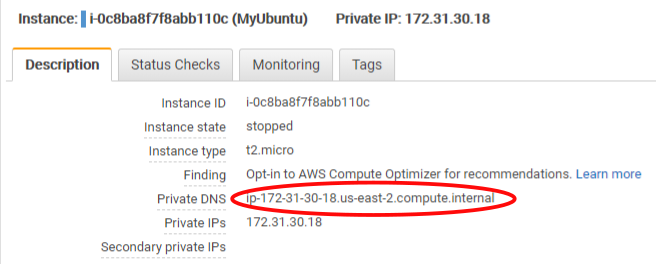
Q-Chem licenses are activated on our central licensing server. Once you have launched the instances, collect their private DNS names (e.g., ip-172-31-30-18.us-east-2.compute.internal) and send a request by e-mail to our licensing team at license@q-chem.com. The DNS names can be found under the Description tab in the "Private DNS" field. Please include your Q-Chem order number and a list of all instance DNS names you wish to activate. Your request must be sent from an e-mail address associated with the referenced Q-Chem order. We will do our best to activate licenses as soon as possible, but please allow up to two business days for the activation process. To avoid charges from Amazon for running instances while waiting for Q-Chem licenses, make sure to stop them.
At this time we permit up to 10 instances per customer; if you'd like to use more than 10 instances, please contact us at support@q-chem.com to discuss your situation.
-
Run Q-Chem calculations
See below for a step-by-step guide to connect to the EC2 nodes and run Q-Chem via IQmol graphical user interface or SSH terminal.
-
After finishing Q-Chem calculations
-
IQmol downloads job output from the server after the job finishes to the local workstation.
-
Jobs launched using IQmol are saved on the instance in the /home/ec2-user/iqmol directory. These files can be downloaded using SCP using the same key. Consult Transferring Files to Linux Instances from Linux Using SCP for more details.
-
If the instance is no longer in use, log out from your terminal (if using SSH) and choose to "Stop" or "Terminate" your instance through the "Actions/Instance State" menu on the EC2 Instance dashboard.
-
Important! If you choose to terminate your instance, all the data in your instance will be lost. Make sure to transfer job files before terminating the instance.
-
Important! If you leave your instance running, Amazon will keep charging usage fees. Remember to stop your instance after completing calculations.
-
A stopped instance must be started again before new Q-Chem jobs can be submitted via IQmol or SSH. After the instance is restarted, it is assigned a new public DNS. Make sure to make adjustments in IQmol server settings.
-
Using IQmol to run Q-Chem jobs on EC2 compute nodes
IQmol has capabilities to submit Q-Chem jobs to a remote server and keep track of calculation progress via the SSH protocol. To establish SSH connection, IQmol requires the key pair generated by AWS.
-
Initial preparation of the key for IQmol
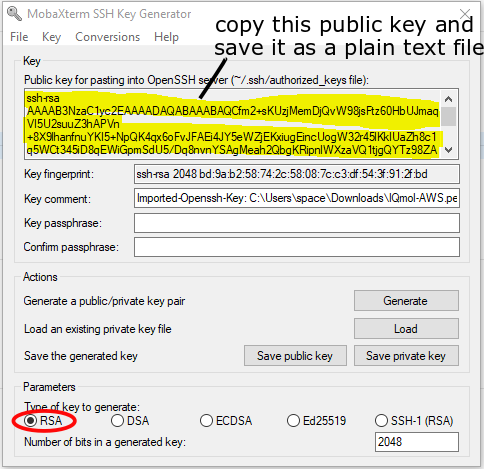
Load the saved key pair file (.pem) for your instance with an SSH key generation tool. On Windows, you may use PuTTYgen. Here we use the key generation tool of MobaXterm as an example. For more documentation about key generation for AWS EC2 on different platforms, see Amazon EC2 key pairs. Find the MobaKeyGen tool in the "Tools" menu, load the .pem key file, as shown in the picture to the left.
Copy the public key in the key generator window and save it as a plain text file. Remember the type of the key should be set as RSA (circled in the picture). This is the SSH Public Key to be loaded into IQmol.
-
Set up a remote submission server in IQmol
-
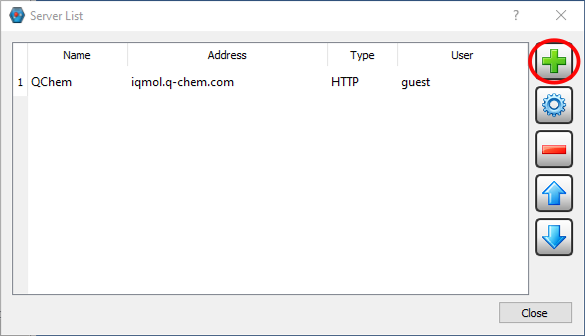
Launch IQmol, under the menu "Calculation", click "Edit servers":
-
Click the "+" button (see the picture above) to add an AWS server:
-
Download the IQmol configuration file (.cfg) and save it locally.
-
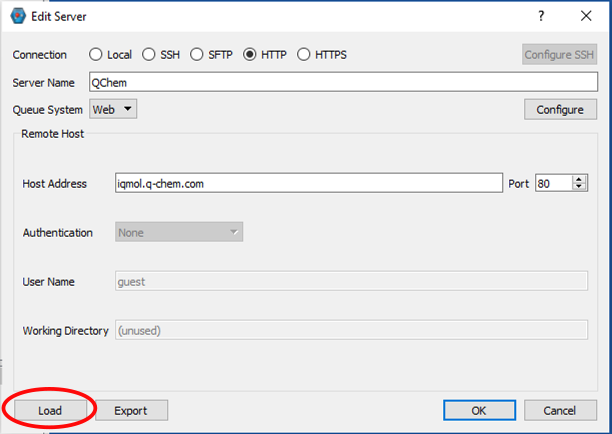
Click "Load" (circled in the picture above), browse to the saved IQmol configuration file and load it. Put the public DNS name (*.compute.amazonaws.com) of your EC2 instance in the Host Address box as shown in the following picture:
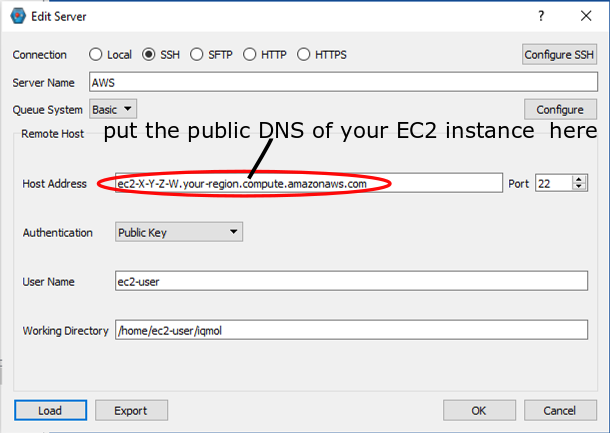
Note: Each time the instance is stopped and restarted, the public DNS name changes. Remember to update Host Address after a stop-start cycle.
-
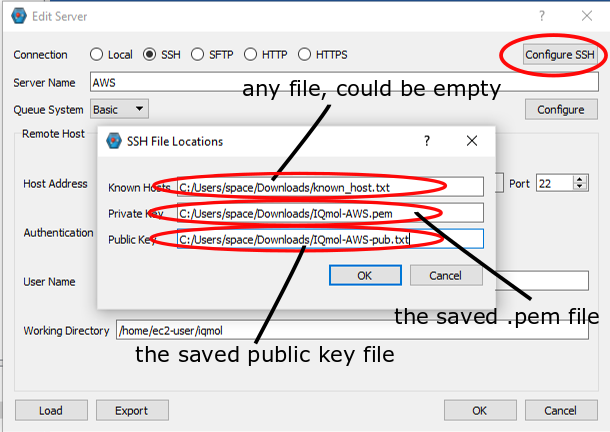
Click "Configure SSH", then set the configuration as shown in the following picture:
-
After finishing all the configurations, click "OK" and you will see a newly added AWS SSH server.
-
-
Submit a calculation to the EC2 instance
Use IQmol to build or load a molecule, then under the menu "Calculation" click "Q-Chem setup" to prepare a Q-Chem input file. At the right bottom of the input file window choose the AWS server set up in the above step, then click "submit" to submit the calculation job to the AWS server.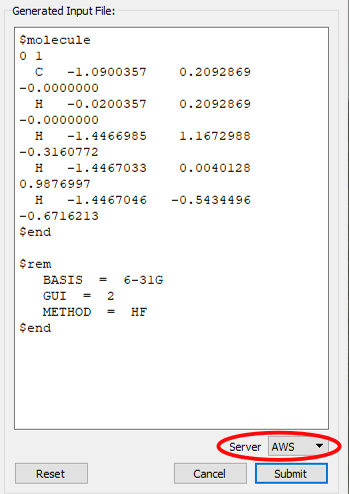
After clicking "Submit" and connecting to the server, IQmol will request for a name for the subdirectory where input and output files will be uploaded. Provide a valid subdirectory name as requested. The job will be submitted to the server, and its status can be viewed in Job Monitor. After the job is finished, IQmol will request if you want to download the output files back to your local machine. Now you can set up a local directory and save the downloaded output files into it.
-
Retrieving files in case of failures
Q-Chem input and output files are stored on the instance in the /home/ec2-user/iqmol directory and can be recovered in case of unexpected failures. Use SSH access and SCP to copy files from the instance as described below.
Accessing EC2 instance via SSH terminal
Methods for accessing EC2 instances will seem intuitive to anyone familiar with accessing remote Linux nodes. Key-based SSH authentication is used instead of passwords for added security.
There are multiple ways to connect a running EC2 instance through SSH. One can either use the browser interface provided by AWS, or use his/her favorite SSH client. Here we describe basic steps, see Connecting to Your Linux Instance Using SSH for a detailed guide.
Through browser-based SSH connection
-
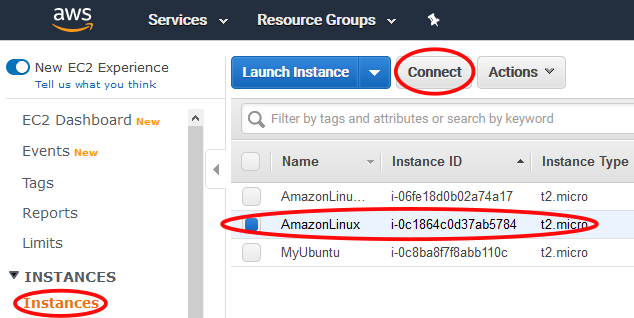
Open the Amazon EC2 console. In the left navigation pane, choose "Instances" and select the instance to which to connect. Choose "Connect".
-
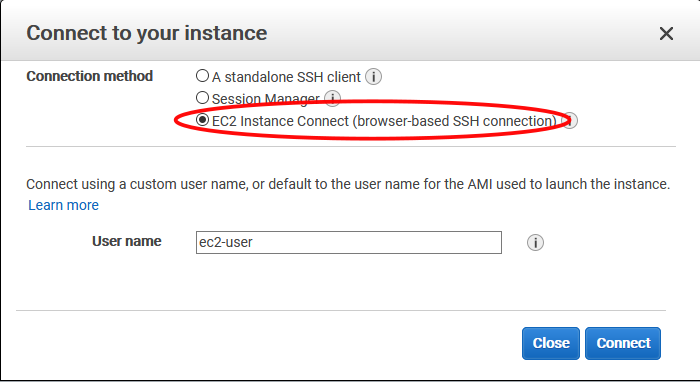
On the "Connect To Your Instance" page, choose "EC2 Instance Connect (browser-based SSH connection)", then click "Connect".
-
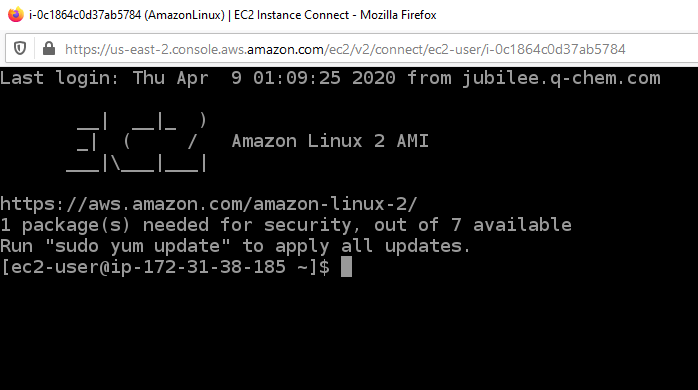
Then in a pop-up browser window, one can login to the EC2 instance.
-
Q-Chem will be accessible through the command line via the qchem command (Q-Chem Manual: Running Q-Chem)
Through SSH client software
-
There are many SSH clients available. Linux and macOS come with built-in command-line SSH clients. On Windows, Putty or MobaXterm are popular SSH clients that can be used to run terminal commands and transfer files. An SCP/SFTP client for Windows https://winscp.net/eng/index.php can be used to copy files to and from EC2 instances.
-
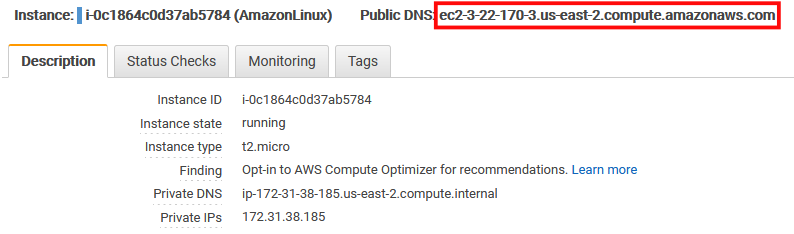
Find the public DNS of your instance, which is needed to set up an SSH connection: click the "Instances" tag in the left panel of the EC2 Dashboard and select the running instance you want to connect to. The lower part of the window shows the information of the instance including the public DNS (boxed in the following picture).
-
On Linux, copy the key pair file (.pem) saved in instance creation step above into your work directory, then run the following command in your terminal: ssh -i your_key_pair_file.pem ec2-user@your_public_DNS to access your instance. "ec2-user" is the default user ID for any instance created with the Q-Chem AMI.
-
Q-Chem will be accessible through the command line via the qchem command (Q-Chem Manual: Running Q-Chem)